New Feature - Randomized Maps
Last updated: Thursday May 7th, 2020
We recently updated our random quizzes by allowing you to create them directly in the text quiz editor itself. Along with this we added a brand new format which allows for randomized maps! Try them out here: Randomized Maps.
You can get started here by clicking "More Options" in the advanced box in Step 1.
You will be presented with 3 new options to select from:
- Random - these are the normal randomized quizzes which simply select a subset of answers from Step 2
- Scramble - similar to random, except a pre-generated "scramble column" will appear in Step 2. When the quiz is played the letters of the answers chosen are scrambled up into that column
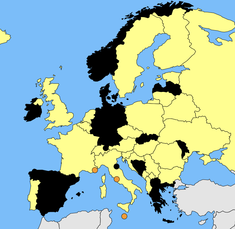
- Random Maps - this take the normal random quiz type and allows you to add a map to it, this then highlights the attached paths of the answers chosen
Once you select a type, the option to choose a number between 5 and 50 will appear, this is the number of answers which will be selected when the quiz is taken.
How to make Randomized Maps
Since Random and Scramble are pretty easy to understand, we'll just elaborate on how to make the most of Randomized Maps as well as customize them. This will assume you already know how to make SVGs or have an SVG ready. You can find SVGs by copying a featured quiz to your /create-quiz, heading to Step 4 and clicking "Download SVG".
How SVGs work on JetPunk
So, now you have an SVG ready and you want to add it and customize it. First, a little background on how SVGs work on JetPunk. In Step 2, you need an extra column on the far left (this is important), then on each row, add the class or id of a path you wish to be colored when referring to that answer. You can find this path by exploring the quiz you copied the SVG from, or by opening it up directly in an SVG editor such as Inkscape.
The Color Classes
Now for the interaction. When an answer is guessed, the path associated with that answer (specified in Step 2) is given the class "svg-correct", this simply colors it green. Similarly when answer is missed after finishing, the class "svg-incorrect" is given to it, coloring it red. There is one extra class which is used for SVGs on JetPunk, which is the "random-svg-highlight" class, which is exclusively used to color selected answers on random maps black.
Changing Colors / Properties
Changing the color or properties of a class can easily be done with some basic CSS. Simply add a "style" tag to the end of your description with the class changes inside it. For example, this will make the "random-svg-highlight" class turn objects blue with 50% opacity instead:
<style>
.svg-holder .random-svg-highlight {
fill-opacity: 0.5;
fill: #0000ff;
}
</style>
How this works is basic CSS, but I'll quickly run through it. The first bit is the style tag, this is actually HTML and the text inside this won't show up visually on the page, so we can add CSS changes inside the start and closing tag (closing tags have a "/" to signify they're closing). To specify what class we want to change add ".svg-holder" to specify the object the svg is held within, then simply add a "." before one of the classes mentioned above, then open up curly braces { } to change the properties this class has. Inside the curly braces you can change CSS properties by specifying the property name (here fill or fill-opacity), then a colon ":", then the value to change to. In this case fill-opacity is a number between 0 and 1, and fill is a color using HEX color coded values.
Occasionally, this will not work. Usually it will be a syntax problem, but if you're syntax is all correct, then potentially it's clashing with with JetPunk's defaults. To override this you can add "!important" to the end of it, this should override the property. An example of this is below, this changes the color of correct answers to black:
<style>
.svg-holder .svg-correct {
fill: #000000!important;
}
</style>
That's about it! There's just a few things to learn and you'll be up and running with custom changes to your maps on JetPunk. It should be noted that "Fill-in-the-map" quizzes use different classes, so this will not work.
Useful Resources
Some useful resources for various things related to this topic:
- HEX Color Tool - this site allows you to easily pick the color you need. Remember you also need the # when defining color values in CSS.
- CSS Properties - a list of many many CSS properties which you can change and adapt. The most common ones you'll want are "fill", "stroke" and "opacity".
- HTML Tryit Editor - this online HTML editor allows you to play around with HTML and CSS to get familiar with it
- Inkscape - the primary resource used by many JetPunkers to create SVG maps. It's completely free to use and open source. The process of making maps is quite complicated, but you can get help by visiting the JetPunk Discord, there's a basic tutorial there and plenty of members who are willing to help you out getting started in map making.
.svg-incorrect — turns missed answer on a typing quiz red
.random-svg-highlight — used to turn selected answers on random svg quizzes black
.svg-highlight - by default does nothing, given to a path associated to the highlighted answer on a yellow box SVG quiz
These require ".map-holder" beforehand not ".svg-holder":
.map-highlight — turns the current selected path in a “Map Quiz” blue
.map-correct — turns a correct path in a “Map Quiz” green
.map-hidden - hides a path until it has ".map-highlight"
(There's no map-incorrect due to how Click quizzes work)
Others:
.zoomable-circle — add to a circle to make JetPunk shrink the circle when the map zooms in
.border — gives paths a nice border when zooming in
.small-stroke — this is added to paths with the "border" class when zooming in, you can edit this to change properties that only happen upon zooming
So if I have a map with many paths and I want the paths that are answers to appear in a different colour in a non-random quiz, can I do that without having to edit the single paths? From your list it seems to me that you can't but maybe I am missing something. Thanks